• About Me
  • Contact Me
  • Disclaimer & Disclosure Policy
    • Facebook
    • Instagram
    • Pinterest
    • RSS

Mainely Katie

  • Travel
  • National Parks
  • Renovation & DIY
  • Lifestyle

Easy DIY Rope Basket Tutorial

in Renovation & DIY on 02/02/21

Pin
Share
Post

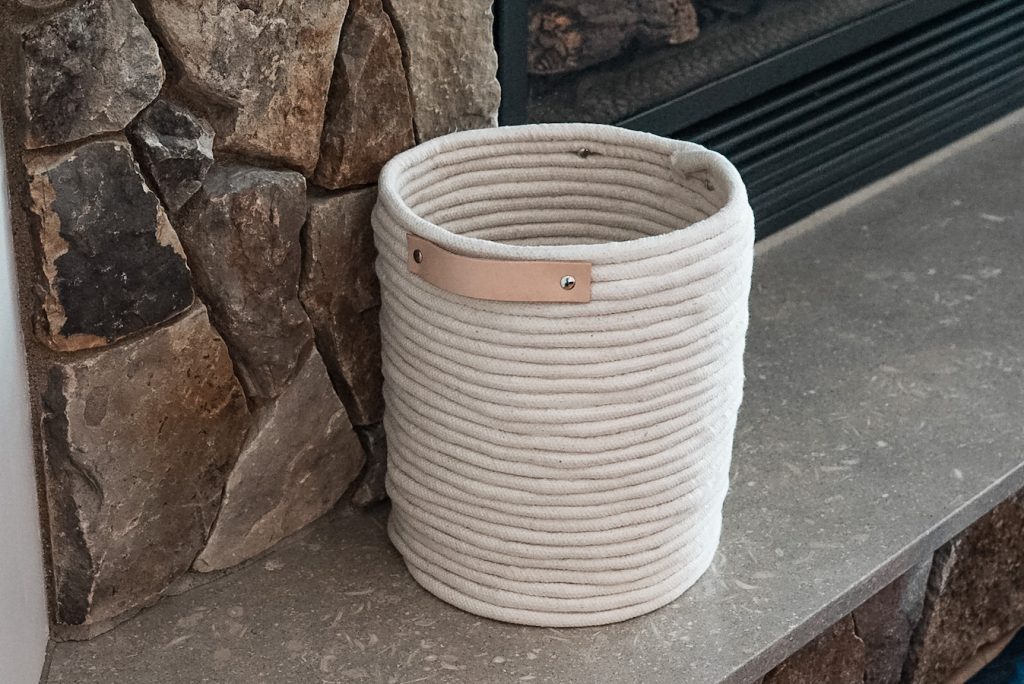
My favorite part of storage and organization is finding cute baskets and bins to put things in. And it makes for some really cute home decor! This coiled rope basket tutorial was inspired by this storage basket from Target. Although I wanted to make one that was a little bigger.

After a little online research and a trip to Hobby Lobby, I had everything I needed for my coiled rope basket tutorial. The best part about this project is there is no sewing involved! This project is not hard, but it is a bit tedious and time consuming.

Materials

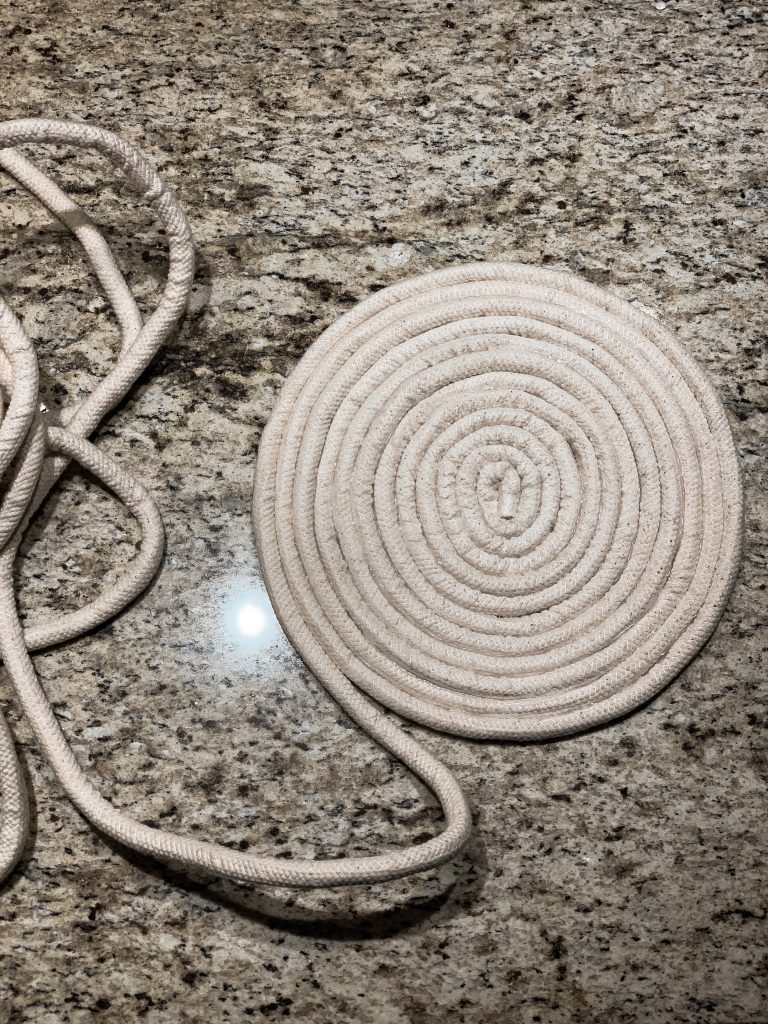
  • Cotton piping (I used 1″ and about 30 yards)
  • Hot glue gun and hot glue sticks
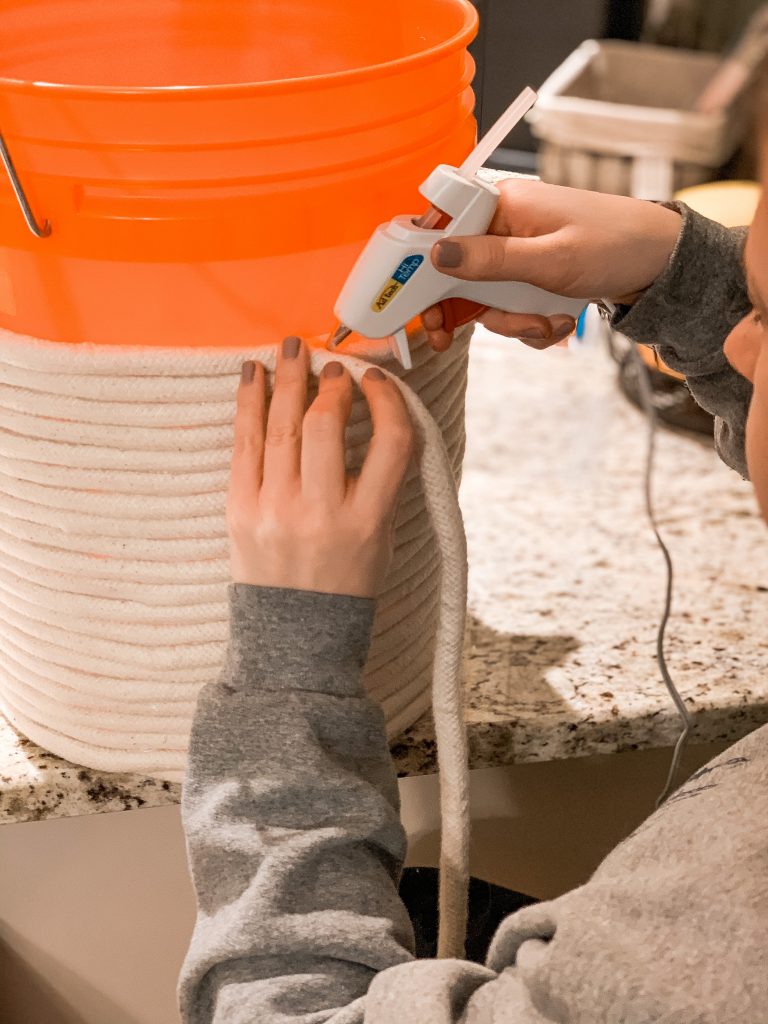
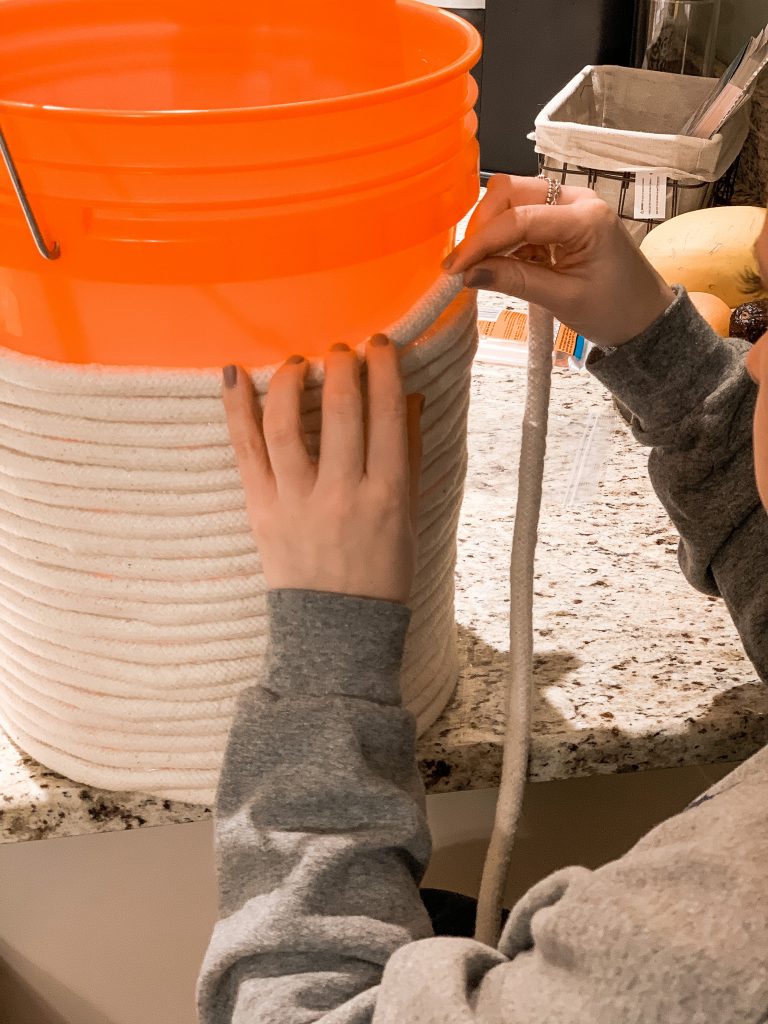
  • Metal or plastic bucket (this will serve as your guide)
  • Leather handles
  • Leather hole punch
  • 4 Screw posts

As always, I will give you some alternatives for each material in this post so you can make your basket to fit your needs and budget.

Material Alternatives

  • Cotton piping- you could use actual rope (this is much heavier than the cotton piping and would require more glue. You could also dye the the cotton piping to make different colored baskets.
  • Guide- you can use galvanized buckets, other baskets that you like the shape of, trash cans, plastic bins, ect
  • Handles- braided leather, cloth handles, leave gaps in the fabric to make built in handles, or no handles

DIY Rope Basket Step 1: Starting the Bottom

Start by coiling your cotton piping into a large circle. You will want to glue the edge as you go around, making sure that each strand is firmly secured to the one before it. Make the base about 1 inch larger than the base of your bucket/guide to ensure that you will have room when you make the sides.

DIY rope basket coiling the bottom

DIY Rope Basket Step 2: Making the Sides

Place the bottom of your rope basket onto the bottom of the bucket, with the bucket right side up. Then start coiling and hot glueing the piping around the sides of the bucket, with the bucket serving as your guide. You will probably get glue on your bucket, but that’s ok just make sure that you can get it unstuck. Coil your rope as tall as you want your basket to be.

DIY Rope Basket Step 3: Attaching the Handles

I love the looks of the leather handles with this rope basket and they were really easy to attach.

DIY rope basket handle

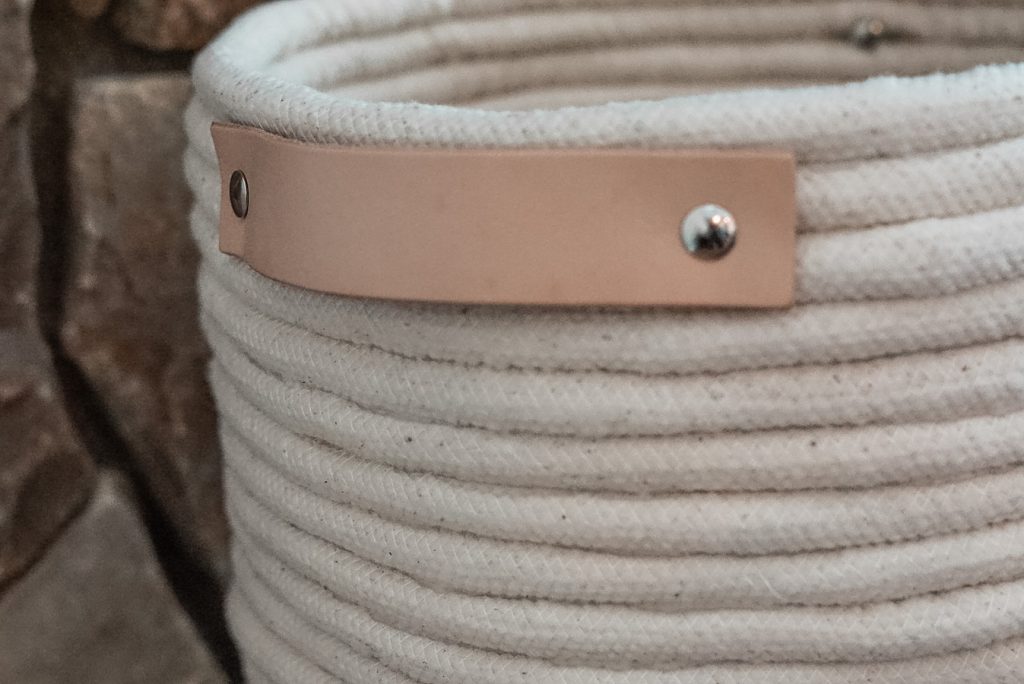
Use the leather hole punch to make a hole on either side of the leather strap. If you don’t have a leather hole punch, I used a utility knife to cut a small “x” in the leather. Make it just big enough to fit the rivet through. Next, you will need to use scissors or a screwdriver to make a hole between the ropes in your basket for the rivet. Then use your rivets to attach the handles to the basket. If the rivet seems a little loose, use some hot glue to secure it in place.

This DIY rope basket project was super easy and cost less than the basket I had my eye on at Target. I referred to the tutorial from Nadine Stay to get inspiration for my own DIY rope basket. She has the best home decor and interior design inspo!

I have been on a DIY kick lately! It has been a lot of fun to try and make new things or learn a new skill. Check out more of my tutorials here.

Pin
Share
Post

4 Comments

Subscribe

« International Bucket List Experiences
DIY Chunky Knit Blanket Step by Step Tutorial »

Comments

  1. Ashley says

    February 3, 2021 at 12:19 am

    Oh my goodness, I love this basket!! So neat and seems fairly easy to make. 🙂

    Make Life Marvelous

    Reply
    • Katie says

      February 5, 2021 at 3:51 am

      Thank you! I was so excited how this turned out! I got all the supplies at Hobby Lobby and it only took about an hour to make.

      Reply
  2. WeWrap Smile says

    January 29, 2024 at 9:51 am

    Thank you for this article. I have found it very useful and will use it as a reference in the future.
    #cotton rope basket

    Reply

Trackbacks

  1. DIY Chunky Knit Blanket Step by Step Tutorial - Mainely Katie says:
    March 6, 2021 at 2:54 pm

    […] Easy DIY Rope Basket Tutorial […]

    Reply

Leave a Reply Cancel reply

Your email address will not be published. Required fields are marked *

Subscribe to Our Newsletter

The Lara Casey Shop

Popular Posts

canyon zion national park

One Day at Zion National Park – Take a Day Trip from Las Vegas

canyon zion national park

The Perfect 4 Day Las Vegas Itinerary plus Day Trips

What to do in Death Valley In One Day

ultimate girls weekend Austin, TX

Girls’ Weekend in Austin, Texas

Join Us on Instagram

Open
He’s too cute to be mad at though 🐶
Open
This is your sign to visit the coast of Maine this summer 🌊🌲

There is no better place to spend the summer months!
Open
When I first visited Utah, i was in awe of the landscape. It’s like nothing I have ever seen before and nothing like Maine. Visiting Canyonlands National Park was high on my bucket list!

#nationalpark #visitutah #canyonlandsnationalpark #travelutah #travelblog #canyonlands
Open
Hi there, my name is Katie and I’m the girl behind Mainely Katie. My husband and I have developed a love for travel since college and are a planning a trip any chance we get. We have been to almost 20 countries together and have made a goal to visit every US National Park. 

My goal has never been to travel full time. I still work a full time job, but I am able to maximize my PTO to travel at least 4-6 times a year. 

My goal is to show people that travel is attainable for the average person. You don’t have to travel full time or quit your job to see the world! (But you totally could if you wanted to!)

We max out our PTO and help plan an ultimate family vacation every year (even at 32 years old)! We take advantage of long weekends, cheap flights and hotel points. Lots of people we work with always ask about our adventures, how we book them, how we find time. I started a blog to document all of our trips and I include lots of details. Traveling someplace new can be intimidating and I want people to feel confident when they plan their trips! 

Now we have a 5 month old and we can’t wait to take him on all our adventures. We have even decided to start over with our National Park bucket list so he can see them all too! 

Over the last few years, I have loved learning about photography and have documented all our trips. This has now turned into a love for content creation. With the help of TCP, I can level up my skills and more show people that travel is possible for everyone. Even with a full time job and a family! 

#tcpdream #tcp #travelblog #tcpchallenge
Open
It was worth it though!
Now I understand why they are called the Great Smoky Mountains 🏔️
Open
We actually started in Las Vegas and made our way to Salt Lake City, Utah 🚘 
Hours of driving and hundreds of miles out on the rental car, but we would do it all over again
Open
Our Italian roadtrip 🇮🇹 🚘 
Rome
Lake Como
Venice 
Cinque Terre
Pisa
Parma
Open
Tag a friend that will eat endless cheese fondue with you in Switzerland 🧀 

Cheese fondue was at the top of my list for things to eat in Switzerland. We order theee differnwt kinds and it did not disappoint 🤌🏼
Open
Can’t wait to take Bryce to all of our favorite places ✈️
Follow on Instagram

Copyright © 2025 · glam theme by Restored 316

Copyright © 2025 · Glam Theme on Genesis Framework · WordPress · Log in